2-D designer
Use the 2-D workspace to inspect the same live sail in orthographic views, drag its current shape handles, or enter exact values beside a handle.
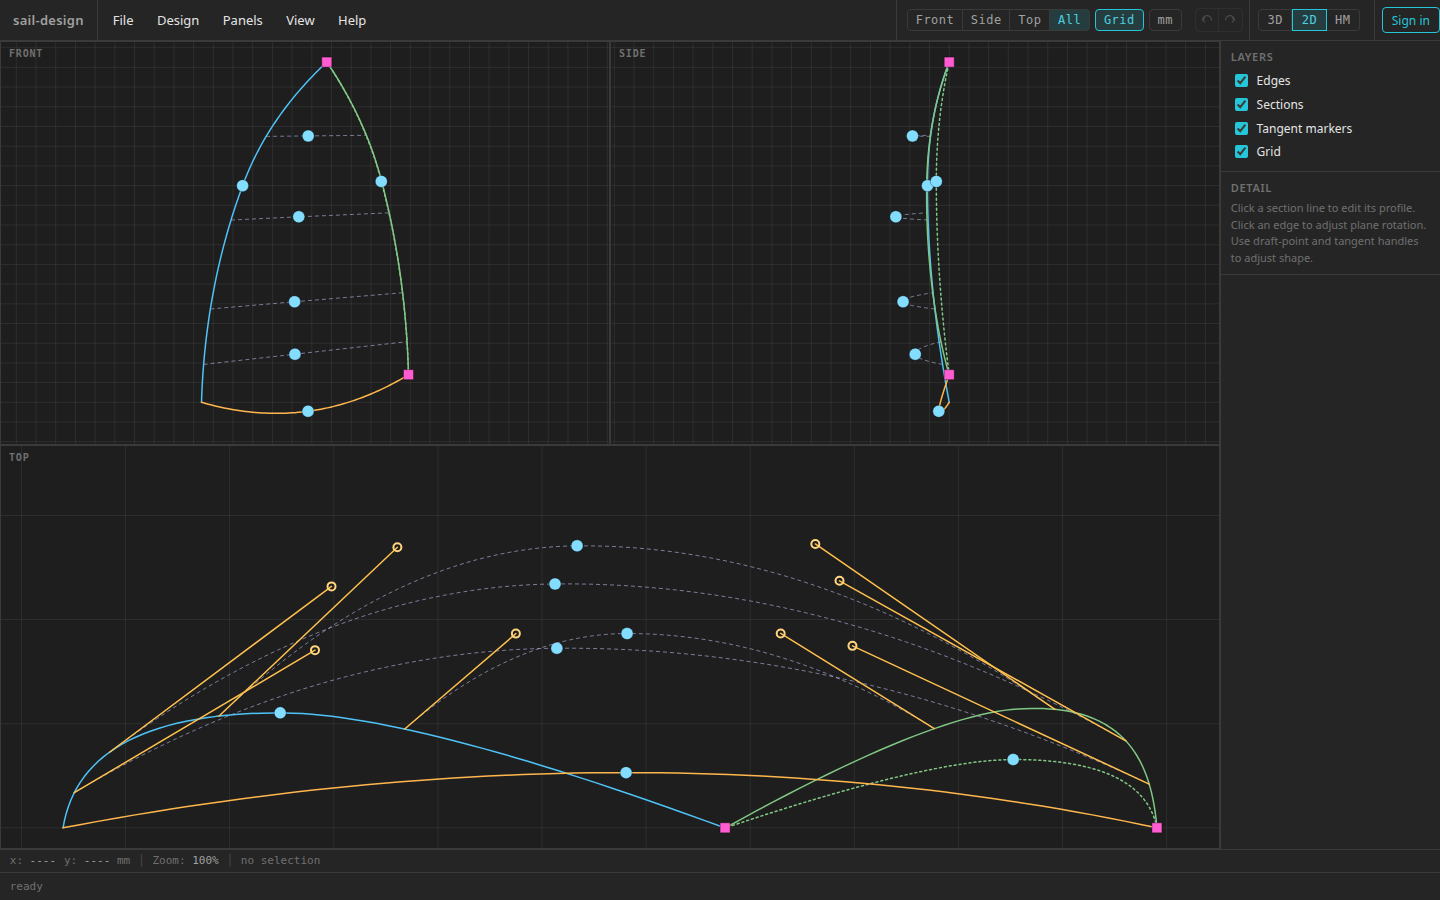
All shows three projections of the same Albin Vega 27 gennaker example. Each subview keeps its own pan and zoom.
- Front projection
- Side projection
- Top projection and tangent handles
- Layers and selected-detail pane
Choose an orthographic view
Click 2D in the top-right canvas switch. The first visit in a session opens All; after you choose another view, your choice is retained while you switch workspaces.
| View | Current behaviour |
|---|---|
| Front | Sail-face projection; the most complete keyboard traversal, including corner handles |
| Side | Camber projection, mirrored to match the 3-D side orientation |
| Top | Plan projection; the only view that draws tangent handles |
| All | Front and Side above a full-width Top view |
In All, each subview pans and zooms independently. The bottom coordinate and zoom readout follows the subview most recently used. A focused handle is shared across the three projections; its numeric popover is placed in the Top subview.
The right-side Layers section starts with Edges, Sections, Tangent markers, and Grid visible. The top-bar Grid button and the right-side Grid checkbox control the same grid state.
Drag the current handles
The visible handles change parameters already used by the Shape and Profile controls; they do not create an independent 2-D copy of the sail.
| Handle | Where it appears | What a drag changes |
|---|---|---|
| Cyan circle on an edge | Luff, leech, and foot in each projection | Edge round, its position, and opening |
| Cyan circle on a section | Every displayed section | Draft position and depth; Front cannot show the depth direction, so its drag changes draft only |
| Amber tangent tip | Start and end of each section in Top | Entry/exit angle for Cubic profiles, or tangent round for two-arc profiles |
| Magenta square | Clew and the current head handle or handles | Clew cords, luff cord, or head length/angle; the tack is fixed |
Clicking an edge line also opens its Opening slider in the Detail pane, with Round, Open, and Hollow positions. Clicking a section line opens that section's profile controls. The full profile workflow belongs in Profiles and fullness.
Enter an exact or relative value
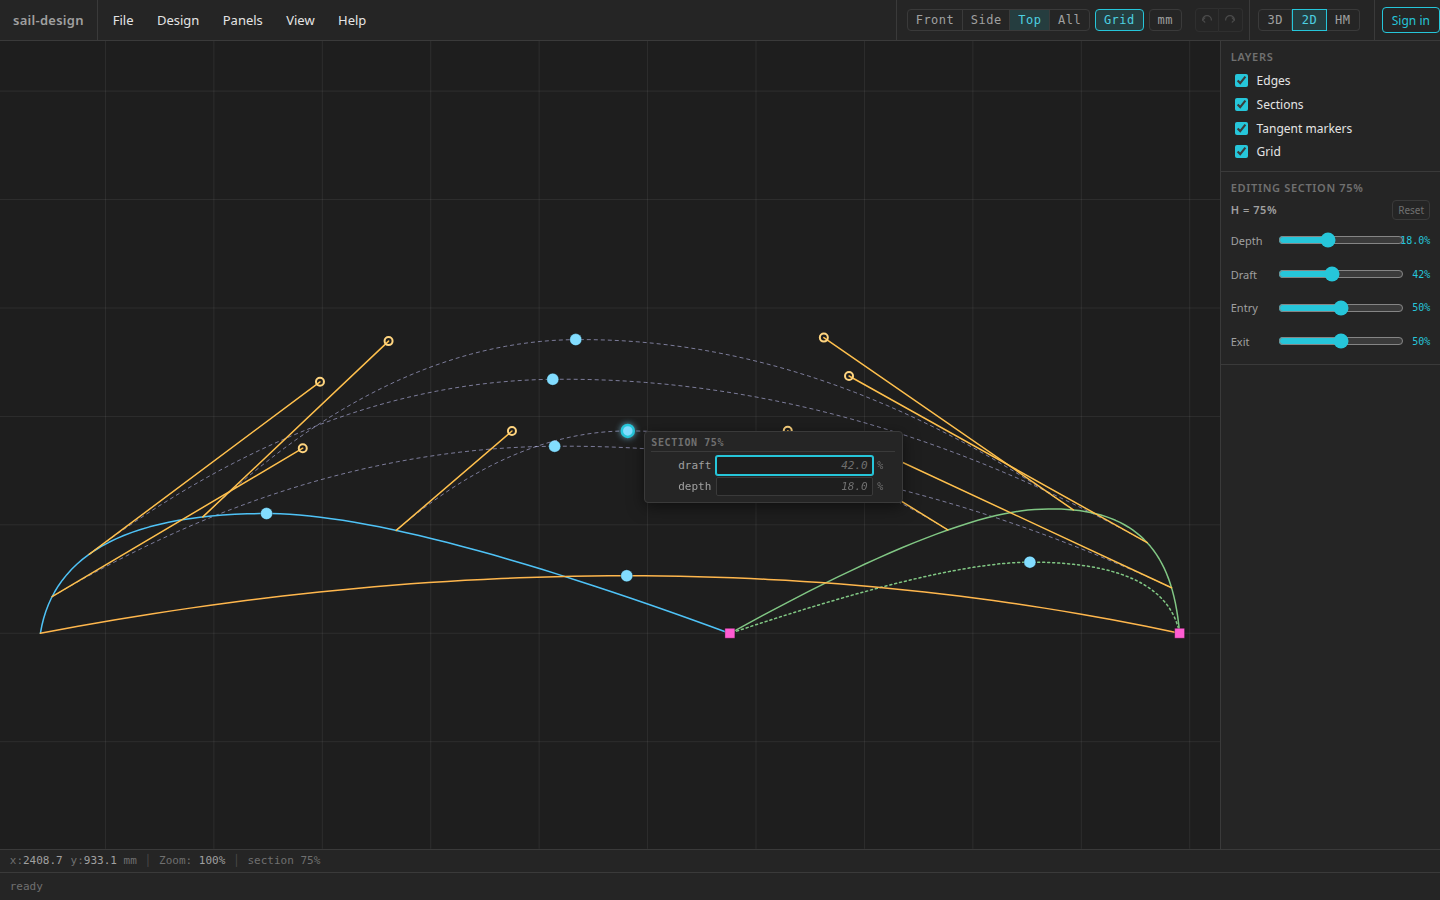
Clicking a handle focuses it, highlights its glyph, and opens fields in that handle's natural units.
- Focused section draft handle
- Draft and depth input popover
- Matching section detail controls
Click a handle
The popover opens beside it and focuses the first field. Current values appear as placeholders. Units are specific to the parameter: millimetres, percentages, or degrees.
Type one value
Enter a plain number for an absolute value. Enter
+5to add 5 to the current value. To subtract 3 from the current value, enter--3; a plain-3means the absolute value negative 3.Press Enter, move focus away, or press Tab to apply a non-empty field. Other fields in the same popover stay unchanged. There is no Apply button.
Move through fields and handles
Tab moves through the fields. Pressing it after the last field moves to the next handle and repositions the popover; Shift+Tab moves backwards and the order wraps. Escape clears the handle focus.
Corner squares are directly draggable in every projection, but the current Tab order includes them only in Front. In Top, the order covers edge handles, then each section's draft and tangent handles.
Nudge or drag
With an empty popover field focused, press an arrow key to nudge by 0.1 in that field's displayed unit; hold Shift for 1 unit. Horizontal arrows act on the first field and vertical arrows on the second; a one-field tangent uses horizontal arrows.
You can instead drag the glyph. The popover hides during the drag, the other workspace updates live, and releasing the pointer records the whole gesture as one undo step.
Press ? while the 2-D workspace is active for the in-app handle help. See Mouse and keyboard controls for the complete shortcut table.
Pan and zoom without editing
- Scroll the wheel to zoom towards the pointer.
- Middle-drag, or hold Space and left-drag, to pan.
- Press E, or press Z then E, to fit the active view to its extents.
- Press Z then W, then drag a rectangle, to fill the viewport with that window. Press Escape to cancel the window before drawing it.
In All, these actions affect only the active subview. Pan and zoom for Front, Side, and Top are retained separately, including while you visit 3-D.
Undo and compare with 3-D
The top-bar Undo and Redo buttons use one history for the whole design. Ctrl/Cmd+Z undoes; Ctrl/Cmd+Shift+Z or Ctrl/Cmd+Y redoes. A pointer drag is recorded at release, and a typed field is recorded when it is applied.
History covers committed measurements, cloth properties, and construction settings. It does not undo camera position, 2-D pan/zoom, selected view, layer visibility, grid visibility, or units. Starting or opening a design clears the old timeline; making a new edit after Undo clears Redo.
Because 2-D and 3-D share one design, a handle drag reshapes the 3-D mould, and a Shape or Profile edit made beside the 3-D canvas moves the matching 2-D curves and handles. You do not need to save, apply, or regenerate between the two workspaces.